Web Stress Tests: Part 2

Now that I have a web performance test that is run repeatedly by the loadtest, I want to alter a couple of things.  First, I want to change the Url from local host to another environment.  In my case, WinHost.  Here are the two Urls:

http://localhost:3002/AddingMachine.svc
http://www.tenfingersfree.com/tff/AddingMachine.svc

To allow the Url to be configurable, I want into the Web Text Editor and pressed on the parameterize Web Servers button

image

After this dialog box:

image

The Web Test in the project auto-magically puts in a parameter into its Url property

image

I then updated the Url to include the service name

image

I then ran my web test and it failed.

image

Apparently, I don’t need the service name in there.  Taking it out gives me green.

I then swapped in the WinHost web server and I still get green


So the next thing I want to make dynamic are the input parameters.  To that end, I created a notepad file like so:

image

I then changed the extension to .csv and imported it into the web test via the Add Data Source button on the test


image

It looks by default it assumes the 1st row is a column heading.  The only thing I changed from the default is the access method property of the table to random:

image

I now have to get these values into the String Body.  The MSDN documentation assumes that I will be altering input via the query parameter or the post parameters.  I am not doing that, I need to update the String Body.

image

to

image

When I ran it, I got this:

image

I then binged into this article that showed me how my data source syntax was wrong and how to get the correct syntax generated for me:


image


And I updated the string body like so:

image

And sure enough – different numbers thrown at my web service:

image

Wahoo!

XML Code Comments


I made a new-years resolution* to learn more about XML code comments and the associated language – MAML.  To that end, I installed Sandcastle and the Sandcastle Help File Builder  – now found here and here.

I then when to one of my many “Hello World” projects laying around my file system.  The sum total of the project is this:

public class Program
{
    public static void Main(string[] args)
    {
        WriteMessage("Hello World");
        Console.ReadKey();
    }

    public static void WriteMessage(string input)
    {
        if(String.IsNullOrEmpty(input))
        {
            throw new ArgumentNullException("Input cannot be empty.");
        }

        Console.WriteLine(input);
    }
}

Note that the scope of the class and methods are public.

I then went into project properties and checked off  XML Document file:

image

I then hit F6 and….

image

How cool is that?  VS2010 tells you if you are missing comments – it keeps track of things so you don’t have to.  So now I have to add some comments.  I went above the class and hit /// and presto-chango, I get an awesome block of code comments.  The other nice thing about this snippet is that if there are parameters, that gets pre-filled for me.  For example, the WriteMessage snippet looks like:

        /// <summary>
        /// 
        /// </summary>
        /// <param name="input"></param>

I then went ahead and added code comments to that method:

        /// <summary>
        /// Writes a message to the console window.
        /// </summary>
        /// <param name="input">The message to be written.</param>
        /// <exception cref="ArgumentNullException">If the input is null or empty.</exception>

Note that when you hit ///, you get an option of a bunch of different kinds of comments.  A full list for is found here.  Also note that my comments are all in grammatically-correct English with punctuation.  Finally note that I use param for the input, not paramref in the summary…

I then added a class-level comment and changed the scope of Main.  I hit F6 and I now have an XML code comment file created and ready in my bin directory.

image

I then loaded up Sandcastle Help File Builder and created a new project:

image

I then added a reference to the XML file that was generated by Visual Studio Project Explorer-> Documentation Sources –> Right Click Add.  Then, I hit Build (the two down arrow button) and magic happened – right in front of my very eyes. 

image

Opening up the .chm file, I got full-blown help file. 

image 

There was one problem, as you can read in the output from SHFB:

Warn: ShowMissingComponent: Missing <summary> documentation for N:Tff.VisualStudioBuildExample

And in the help file:

image

To get around this, I first started trying to add another XML file in addition to the one that VS2010 generated – a XML Document File – You can read about it here.   I futzed around with it for a bit and then gave up.  I then just added the values a properties in SHFB here:

image

Clicking on the ellipses, you get this dialog where you can enter in your summaries:

image

And then you get the namespace comments:

image


* Nepali New Year is celebrated on the 1st of Baisakh Baisākh (12–15 April) in Nepal. Nepal follows Vikram Samvat (विक्रम संवत्) as an official calender. (Not to be confused with Nepal Era New year).  Thanks Wikipedia!

Where am I building?

One of the cool things about Visual Studio is that it hides much of the project deployment and configuration from the developer.  For example, if you create a new console project in Visual Studio 2010, type in a couple lines of code,  and hit Run (F5), things just work.  You get a .exe created and it runs.

Microsoft does a good job explaining all that is going on here.  If you haven’t read through these posts, I highly recommend that you do – you can understand the magic that is going on.  There are some conventions that Visual Studio uses that are not necessarily documented clearly.  Note that I am using C#.

When you create a new Console project, Visual Studio places a directory on your file system that you specify in the Location text box.

image

In that directory, it creates a .csproj file, a Program.cs file, and 3 directories.

image

If you open bin, there is a folder called Debug and in that folder, there are these files that VS2010 created for you:

image

These files are the linkers between your soon-to-be-running .exe and visual studio – it associates VS2010 debugging with your project.  A full explanation can be found here.   If you double-click on it (it is a .exe after all)…. Nothing happens. 

The obj folder has a series of subfolders and 1 file:

image

The stuff in the obj folder is none of your concern.  It is the place where Visual Studio 2010 takes your source files and creates a working assembly.   If you open the .cache file in notepad, you get semi-readable stuff:

image

In any event. the last folder, Properities, contains code files that you can update.  In this case, it contains a file called AssemblyInfo.  This file contains meta data about your application.  If you open it in notepad, it looks like this:

image 

You can enter info there, or you can use that fancy-pants IDE VS2010 via the Properties Page->AssemblyInformation button:

image

image

However, once you alter it via VS2010, the Properties file does not reflect it until you save the file…

The last stop on this little tour is the .csproj file.  This file is actually a MSBuild file – which means

1) It is well-formed XML

2) It is really hard to read

Most of the projects that I see that are in trouble suffer from dependency bloat – they rely on tons and tons of 3rd party libraries (each versioned differently), other parts of the .NET framework, etc..  The .csproj file is where VS2010 keeps tracks of these dependencies.  This is also where VS2010 keeps tracks of all of those code files that you create/write that vshost uses.

Next, in the build tab of the project properties, there is an Output Path field.  The default is bin\Debug.

image 

This is where VS2010 (vshost actually)  actually creates the .exe.  The reason I bring this up is that if you have 3rd party components that your application is using that are not in the GAC,  VS2010 attempts to build those .dlls and place them in the same directory as the running .exe (assuming you had it marked as Copy Local)

image

If you don’t want VS2010 to put the dependent .dlls, mark them as copy local – false and have them placed in the output directory manually.

Anyway – hope this helped someone  – it certainly helped me…

CLR Profiler: Note to Jamie – Follow These Steps

1) Open CLR Profiler – make sure you are using the 32 bit version for 32-bit apps

2) Make sure Allocations and Calls are checked in the Profile section:

image

3) Start the application using the Start Application button

4) Run the app for a bit

5) Press the Kill Application button to get the following screen:

image


6) The math is: AllocatedBytes – RelocatedBytes = FinalHeapBytes.  ReloactedBytes are the bytes that moved into the garbage collection, FinalHeapBytes are the bytes that never got garbage collected.

7) Views –> Objects By Address.  Select most frequent object.  Right Click Export data to file.  Sort by size and then look at allocated by and callled from

8) Look at the heap graph – only the GC heap and then the tree view

CLR Profiler Gotcha

I fired up the 64-bit version of CLR profiler on my 64-bit machine, attached to a demo Console application and got the following dialog box:

image

The problem is that the application was targeting 32-bit (x86) in Visual Studio.  Since it is a pain in the butt to target 64-bit Console apps from Visual Studio 2010 (see the trail of tears here – note that this is a feature, not a bug in VS2010 Eye rolling smile), I opened the 32-bit version of CLR profiler instead and did my analysis.

Note that you will also get the same dialog box if you run CLR Profiler as a standard user (I always wondered what  sub-standard user was…).  Make sure you run it as administrator.

Visual Studio 2010 Extract Method

A common joke is that more CPU cycles are wasted than are actually used on a typical desktop computer.  Personally, I feel the same way about Visual Studio – I feel like I only use 25% of its capabilities.  I ran into a great refactoring problem over the weekend that demonstrated a really cool feature of VS2010 that literally saved me hours of wasted effort.

As you know, I am working on a Windows Phone 7 port of the timeless classic Panzer General.  I am have gotten the board set up with icons, but I want to know determine the acceptable movement and line of site for an individual unit.  To do so, I would need to loop over all adjacent hexes and see if they were close to the unit – and then loop over those hexes adjacent hexes until I was past an X distance.

I first tried to whip up a recursive method to do this – and after 1 hour or so, I was failing miserably.  I then decided to take a different approach – I hand-wrote each loop (hard coded in) like so:

private static List<Hex> GetTotalAdjacentHexes(Hex currentHex, Int32 maxDistance) { List<Hex> hexes = new List<Hex>(); List<Hex> tempList = GetAdjacentHexes(currentHex); foreach (Hex hex in tempList) { hex.MovementCost = HexFactory.CalcualteMovementCost(hex, currentHex.CurrentUnit); hexes.Add(hex); var tempList2 = GetAdjacentHexes(hex); foreach (Hex hex2 in tempList2) { hex2.MovementCost = HexFactory.CalcualteMovementCost(hex, currentHex.CurrentUnit); hexes.Add(hex2); var tempList3 = GetAdjacentHexes(hex2); foreach (Hex hex3 in tempList3) { hex3.MovementCost = HexFactory.CalcualteMovementCost(hex, currentHex.CurrentUnit); hexes.Add(hex3); var tempList4 = GetAdjacentHexes(hex3); foreach (Hex hex4 in tempList4) { hex4.MovementCost = HexFactory.CalcualteMovementCost(hex, currentHex.CurrentUnit); hexes.Add(hex4); } } } } return hexes; }

The thing is – it works:

image

After an hour of trying to hand-write recursion, I went a different direction – parse out each piece and let VS2010 help me. I too the last for..each (hex4…) and put it into a new method

Just following the default naming conventions, I now have 4 methods that look eerily similar:

private static List<Hex> GetTotalAdjacentHexes(Hex currentHex, Int32 maxDistance) { List<Hex> hexes = new List<Hex>(); List<Hex> tempList = GetAdjacentHexes(currentHex); NewMethod(currentHex, hexes, tempList); return hexes; } private static void NewMethod(Hex currentHex, List<Hex> hexes, List<Hex> tempList) { foreach (Hex hex in tempList) { hex.MovementCost = HexFactory.CalcualteMovementCost(hex, currentHex.CurrentUnit); hexes.Add(hex); var tempList2 = GetAdjacentHexes(hex); NewMethod2(currentHex, hexes, hex, tempList2); } } private static void NewMethod2(Hex currentHex, List<Hex> hexes, Hex hex, List<Hex> tempList2) { foreach (Hex hex2 in tempList2) { hex2.MovementCost = HexFactory.CalcualteMovementCost(hex, currentHex.CurrentUnit); hexes.Add(hex2); var tempList3 = GetAdjacentHexes(hex2); NewMethod1(currentHex, hexes, hex, tempList3); } } private static void NewMethod1(Hex currentHex, List<Hex> hexes, Hex hex, List<Hex> tempList3) { foreach (Hex hex3 in tempList3) { hex3.MovementCost = HexFactory.CalcualteMovementCost(hex, currentHex.CurrentUnit); hexes.Add(hex3); var tempList4 = GetAdjacentHexes(hex3); NewMethod(currentHex, hexes, hex, tempList4); } } private static void NewMethod(Hex currentHex, List<Hex> hexes, Hex hex, List<Hex> tempList4) { foreach (Hex hex4 in tempList4) { hex4.MovementCost = HexFactory.CalcualteMovementCost(hex, currentHex.CurrentUnit); hexes.Add(hex4); } }

You can notice that the 3 final methods all have the same signature. The first thing I did was to make the internal variables sufficiently generic, for example:

private static void NewMethod(Hex currentHex, List<Hex> hexes, Hex hex, List<Hex> currentList) { foreach (Hex tempHex in currentList) { tempHex.MovementCost = HexFactory.CalcualteMovementCost(hex, currentHex.CurrentUnit); hexes.Add(tempHex); } }

I then realized that there are 3 groups of methods. Method Type 1 is for the 1st time through; Method Type 2 is for second to total-1 times through; and Method Type 3 is for the last time.

Concentrating on Type 2 for a second, you can see that they are identical except that 1 calls the other. That seems like a prime candidate for recursion:

private static void NewMethod2(Hex currentHex, List<Hex> hexes, Hex hex, List<Hex> currentList) { foreach (Hex tempHex in currentList) { tempHex.MovementCost = HexFactory.CalcualteMovementCost(hex, currentHex.CurrentUnit); hexes.Add(tempHex); List<Hex> tempList = GetAdjacentHexes(tempHex); NewMethod1(currentHex, hexes, hex, tempList); } }

I changed this line:

NewMethod1(currentHex, hexes, hex, tempList);

To this:

NewMethod2(currentHex, hexes, hex, tempList);

And hit F5 and got this after a delay:

image

Which is another way of saying out of memory… Basically, there is no way out of the for…each without some kind of counter. So I threw a counter into the method and assigned a magic number of 2 (note the last time though, it only assigns and does not recurse. if I added the counter above the for..each, then the last time though would not assign):

private static void NewMethod2(Hex currentHex, List<Hex> hexes, Hex hex, List<Hex> currentList, int counter) { counter++; { foreach (Hex tempHex in currentList) { tempHex.MovementCost = HexFactory.CalcualteMovementCost(hex, currentHex.CurrentUnit); hexes.Add(tempHex); if (counter < 2) { List<Hex> tempList = GetAdjacentHexes(tempHex); NewMethod2(currentHex, hexes, hex, tempList, counter); } } } }

Sure enough, it worked. I then tackled the 1st method by adding hat counter variable and a Hex parameter that is initially placed with the 1st loop though of the collection and then I renamed the method:

private static List<Hex> GetTotalAdjacentHexes(Hex currentHex, Int32 maxDistance) { List<Hex> hexes = new List<Hex>(); List<Hex> tempList = GetAdjacentHexes(currentHex); foreach (Hex hex in tempList) { GetAdjacentHexes(currentHex, hexes, hex, tempList, 0, maxDistance); } return hexes; } private static void GetAdjacentHexes(Hex currentHex, List<Hex> hexes, Hex hex, List<Hex> currentList, int distanceCounter, int maxDistance) { distanceCounter++; { foreach (Hex tempHex in currentList) { tempHex.MovementCost = HexFactory.CalcualteMovementCost(hex, currentHex.CurrentUnit); hexes.Add(tempHex); if (distanceCounter < maxDistance) { List<Hex> tempList = GetAdjacentHexes(tempHex); GetAdjacentHexes(currentHex, hexes, hex, tempList, distanceCounter, maxDistance); } } }

Voila. A working recursive method (that is begging to be refactored even more). Undoubtedly, VS2010 and its extract method refactoring saved me hours.

MSTest Name Conflicts

As part of my day job, I sometimes have to present a solution with a “before” and an “after” project.  Typically, I would create a before solution folder and an after solution folder and put the two different projects in into their respective folder.  I would then flip over to the file system and move the folders around so that the physical paths match the logical paths in VS2010.  I recently created a before and after C# project and I included a test proejct to accompany each working project.  When I tried to include both test projects in the same solution (even in different solution folders), I got this:

image

Apparently, MSTest is run at the solution level, not the project level.  The easiest way out of the problem was to rename the test projects to match Before/After and leave them at the solution level.  Not the best, but it solved my problem in a pinch

VS2010 Parallel Debugger

I just worked through the Parallel Debugger Lab from Microsoft. Holy cow it is awesome.  You can set a break and immediate see all of the threads running with their call stack:

image

You can then drill into each thread (or set of threads you are interested in) and see the associated tasks:

image

And coolest of all, you can see each thread that is deadlocked and where the deadlock is coming from:

image

My only grip has nothing to do with the parallel debugger, it has to do with the poo quality of code in the lab.  Take a look at this code:

image

Horrible naming, unchecked arguments, single-line for multiple commands, weak-typing, uhg!!!!

FTP and WF in TFS

Following the creation of my FTP WF tasks that I created here, I then went to add those tasks into the TFS Workflow.  I already have created a special template and found where I want to add the tasks here so it was only a matter of dropping the tasks into the WF, right?  Wrong.  The WF templates are not part of any given project, so you can’t just create WF tasks in a project and reference them in the template.  You need to add them to the toolbar and to do that, you need to create the tasks in an independent project.  I first tried to right click on the toolbox and add a reference to the project that I just created, however when I went to drag…drop the task into the designer, I got the red “no” symbol.  After some research, I found this post – I have to add these activities to the GAC.  After strong naming the original project and using GACUtil, I then could navigate to C:\Windows\Microsoft.NET\assembly\GAC_MSIL (not C:\Windows\assembly btw) and bring the FTP tasks in.  Interestingly, the top-level task (the sequence) did not “bubble up” the child in and out parameters so I had to drag the 3 actual code activities from the designer and place them into the TFS WF.

image

Once I did that, I need to hook up the build directory to the source for the FTP Copy Directory task.  I didn’t try to alter the path at all, so I had to use the fully-qualified path as so:

image

This corresponds to the file system like this:

image

Note that I am only copying the website (the same way VS2010 does it) and I am not copying the source code or the debugging symbols.

After completing that task, I then checked the project into source control (Development to Main to Release). The build kicked off and the files moved up to the host as expected:

image

Cow-A-Bunga!

I would like to then refactor the WF activities to take all of the code behind and put them on the designer, but that is next week – once I implement these FTP activities to all of the websites that I maintain.

FTP and WF: Setting the Stage

Following up on my post here regarding TFS and WF, I went to write the actual WF tasks that correspond to the FTP activities of moving files over to a remote host.  I crated 3 tasks

The first connects to the FTP Host:

public sealed class ConnectToHost : CodeActivity { FTPConnection _ftpConnnection = null; public InArgument<string> HostName { get; set; } public InArgument<string> UserName { get; set; } public InArgument<string> Password { get; set; } public InOutArgument<FTPConnection> FTPConnection { get; set; } public ConnectToHost() { _ftpConnnection = new FTPConnection(); } public FTPConnection ActiveConnection { get { return _ftpConnnection; } } protected override void Execute(CodeActivityContext context) { _ftpConnnection.ServerAddress = HostName.Get(context); _ftpConnnection.UserName = UserName.Get(context); _ftpConnnection.Password = Password.Get(context); _ftpConnnection.Connect(); } }

I then created a Disconnect Task:

public sealed class DisconnectFromHost : CodeActivity { FTPConnection ftpConnection = null; public DisconnectFromHost() { } public DisconnectFromHost(FTPConnection ftpConnection) { this.ftpConnection = ftpConnection; } protected override void Execute(CodeActivityContext context) { ftpConnection.Close(); } }

And finally created the Task that does the actual copying:

public sealed class CopyDirectoryContents : CodeActivity { FTPConnection ftpConnection = null; public CopyDirectoryContents() { } public CopyDirectoryContents (FTPConnection ftpConnection) { this.ftpConnection = ftpConnection; } public InArgument<string> SourceDirectoryName { get; set; } public InArgument<string> TargetDirectoryName { get; set; } protected override void Execute(CodeActivityContext context) { MoveDirectoryContents(SourceDirectoryName.Get(context), TargetDirectoryName.Get(context)); } public void MoveDirectoryContents(string sourceDirectoryName, string targetDirectoryName) { DirectoryInfo directoryInfo = new DirectoryInfo(sourceDirectoryName); ftpConnection.ChangeWorkingDirectory(targetDirectoryName); foreach (FileInfo fileInfo in directoryInfo.GetFiles()) { ftpConnection.UploadFile(fileInfo.FullName, fileInfo.Name); } foreach (DirectoryInfo subDirectoryInfo in directoryInfo.GetDirectories()) { ftpConnection.CreateDirectory(subDirectoryInfo.Name); MoveDirectoryContents(subDirectoryInfo.FullName, subDirectoryInfo.Name); } ftpConnection.ChangeWorkingDirectoryUp(); } }

I then wired them up in a sequence activity and added a variable to hold the FTPConnection that will be created by the 1st task and then passed to the second and third task:

image

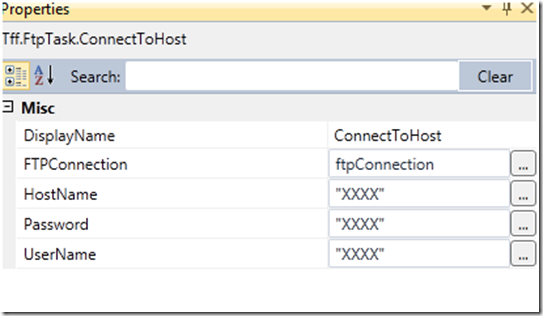
I then assigned values to the ConnectToHost parameters:

image

Note that FTPConnection is an InOutArgument so I can assign it from the higher level sequence.

I then added the arguments to the CopySite Task. Note that the designer handles the slashes (I couldn’t use the @”” syntax):

image

I got an error when I realized I don’t need to use the constructors, rather I need to use the In and OutParameters like so:

1) Create the ftpConnection and pass it out:

FTPConnection _ftpConnnection = null; public InArgument<string> HostName { get; set; } public InArgument<string> UserName { get; set; } public InArgument<string> Password { get; set; } public OutArgument<FTPConnection> FTPConnection { get; set; } protected override void Execute(CodeActivityContext context) { _ftpConnnection = new FTPConnection(); _ftpConnnection.ServerAddress = HostName.Get(context); _ftpConnnection.UserName = UserName.Get(context); _ftpConnnection.Password = Password.Get(context); _ftpConnnection.Connect(); FTPConnection.Set(context, _ftpConnnection); } }

2) Store the FTPConnection in the SequenceActivity’s local variable.

3) Get the FTP as an InArgument and use it:

public InArgument<string> SourceDirectoryName { get; set; } public InArgument<string> TargetDirectoryName { get; set; } public InArgument<FTPConnection> FTPConnection { get; set; } protected override void Execute(CodeActivityContext context) { ftpConnection = FTPConnection.Get(context); MoveDirectoryContents(SourceDirectoryName.Get(context), TargetDirectoryName.Get(context)); }

And boom goes the dynamite! It worked and the files moved over. I can now set up the FTP tasks in the TFS Build Activity.